Metallic decor is trendy, and many of us are choosing metallic touches to spruce up our home decor in silver, gold, brass, copper and other shades.
Gold is no more used only for wrapping chocolate gifts; it has become an elegant embellishment! Whether you want to make ornaments from scratch or embellish store-bought ones, you can lend a sparkly and personal touch by gilding them with real gold leaf. It not only makes them special but also adds an eye-catching shine that belies ease with which you can achieve alchemy.
You can apply gold leaf to ornaments of any material and shape; there’s only one caveat – for successful results – use adhesive size designed for gilding.
Ready to play with gold?

Image Source: Pinterest
Things You’ll Need
- Plastic, wood, cardboard or ceramic ornaments
- Gold-leaf sheets
- Gold-leaf adhesive size
- Foam brush
- Craft knife
- Soft-bristled paintbrush
- Tweezers
- Spray Sealer
- Painter’s Tape
Method
- Start with painting a thin layer of adhesive or glue over the surface of the ornament using a thin foam brush. Depending on the shape and size of the ornament you have picked, you may choose to apply adhesive to only one side at a time, so that it can lay flat to dry.
- Wait till the adhesive becomes clear, meaning tacky enough to hold the gold leaf in place securely. You can search online for a recommended drying time. (It might take upto an hour.)
- Cut pieces of gold leaf sheets, enough to cover the adhesive area of the ornament, with the help of a craft knife. The shapes and sizes of the gold leaf you cut need not perfectly match the adhesive area, as any excess leaf is brushed away later.
- Gently pick up the first piece of the gold leaf with your fingers, tweezers or both. (Do not worry about small tears, as you can still use torn pieces.)
- Then, slowly lay the first piece of gold leaf onto the glued surface. Place it down as smoothly as possible. Do not worry if some wrinkles appear at this stage and resist the urge to smooth them out with your fingers.
- Repeat the procedure with all the remaining pieces of the gold leaf until the entire adhesive area is covered.
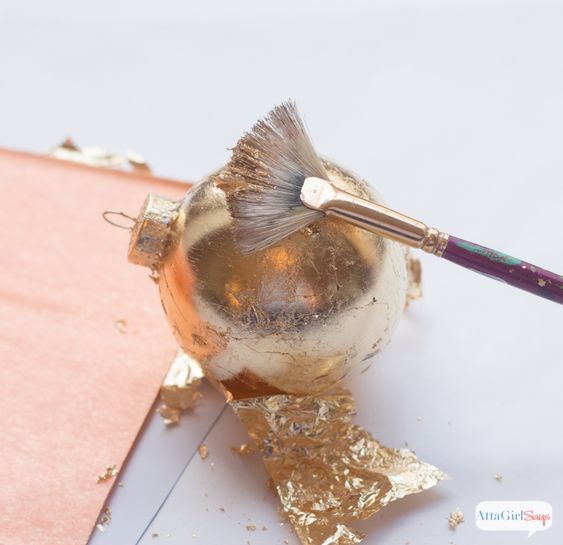
- Apply the gold leaf with a soft-bristled paintbrush in circular movements and cover the complete item. If the item has a textured surface, gently press the leaf into the cracks using the bristles of the brush. (This is the step where you smooth the gold leaf to the ornament’s surface, while simultaneously brushing away extra bits of the leaf.)
- After smoothing and adhering the gold leaf, examine the gilded surface for missing spots. Cut tiny pieces of gold leaf and cover the missing spots. Repeat the brushing process to patch them.
- Repeat the entire process on the reverse side – the side previously left uncovered.
- Once you have covered the ornament with gold leaf, spray the ornament using the spray sealer and then hang it to dry.
Tips
- If you are working with rounded ornaments, suspend them in egg cartons or the ends of cardboard tubes to hold them steady while you work.
- Rather than covering the ornament completely with gold leaf, create stripes or other pattern using a painter’s tape for the template reference before applying the adhesive.
You’ll absolutely love how these ornaments will turn out, giving you the perfect festive feel. And that’s not even it. The coolest thing about gold leaf ornaments is that there are so many ways you can customize them – cover them with glitter, play with patterns, etc. Pretty much everything you do can make the ornaments pretty cool.
You know the drill by now. So, what are you waiting for? Get creative with gold today!
